移植というより普通に作り直してるだけか。
Jupyter Notebookで作成してみた機械学習モデルをデスクトップアプリに移植を行います。
前提など
移植元はJupyter Notebookでなくてもいいかもしれませんが、他の開発ツールとかは全然詳しくないので分かりません。
移植する部分にフォーカスするので、Jupyter Notebookやその他についての詳しいことには触れません。
いろいろと流用してるので構成などは結構ごちゃごちゃな感じがします。
■OS
・Windows 10
■移植元
・Jupyter Notebook
■コードエディタ(デスクトップアプリ)
・VSCode
■デスクトップアプリ化(exe化)
・pyinstaller
今回はサンプルとしてアヤメのデータセットの分類を行います。
【参考】
【機械学習】入門⑫ 分類-2次元入力3クラス分類- Pythonで学ぶ「教師あり学習」 - SEワンタンの独学備忘録
[機械学習]初心者に向けてアヤメ分類を一から解説してみた - Qiita
移植というよりVSCodeで普通に機械学習デスクトップアプリを開発した感じになってるかもしれません。
ちなみにどの要素にも大して詳しくありません。
開発
全体構成
\iris_sampleフォルダを基点として以下のようなファイルを作成します。
関係ないところは一部省略してます。
\iris_sample
 |-- iris_estimated.py
 |-- iris_front.py
 |-- iris_front.py
 |--model
       |--adam_model.pkl
機械学習モデルの保存
exeアプリ化する前に機械学習モデルをデスクトップアプリから呼び出せるようにファイルとして保存しておきます。
こちらのソースはモデルをファイル化するためにあるので、コードエディタ上で実行したらデスクトップアプリには含めません。
・サンプルソース(iris_learning.py)
## iris_learning.py
import numpy as np
import joblib
from sklearn.datasets import load_iris
from sklearn.model_selection import train_test_split
from sklearn.neural_network import MLPClassifier
from sklearn.metrics import classification_report, accuracy_score

# データ取得
iris = load_iris()
x, y = iris.data, iris.target

# 訓練データとテストデータに分割
x_train, x_test, y_train, y_test = train_test_split(x, y, test_size=0.5, random_state=0)

# adam による学習
adam_model = MLPClassifier(solver="adam", random_state=0, max_iter=3000)
adam_model.fit(x_train, y_train)
# モデルの保存
joblib.dump(adam_model, "./model/adam_model.pkl", compress=True)

# SGD による学習
sgd_model = MLPClassifier(solver="sgd", random_state=0, max_iter=3000)
sgd_model.fit(x_train, y_train)
# モデルの保存
joblib.dump(sgd_model, "./model/sgd_model.pkl", compress=True)

#学習結果の出力
adam_pred = adam_model.predict(x_test)
f = open('./model/adam_result.txt', 'w')
wtext="adam_model result: " +  str(adam_model.score(x_test, y_test))
f.write(wtext)
f.write("\n")
f.write(classification_report(y_test, adam_pred))
f.close

sgd_pred = sgd_model.predict(x_test)
f = open('./model/sgd_result.txt', 'w')
wtext="sgd_model result: " +  str(sgd_model.score(x_test, y_test))
f.write(wtext)
f.write("\n")
f.write(classification_report(y_test, sgd_pred))
f.close
実行すると以下のようなファイルが出力されます。
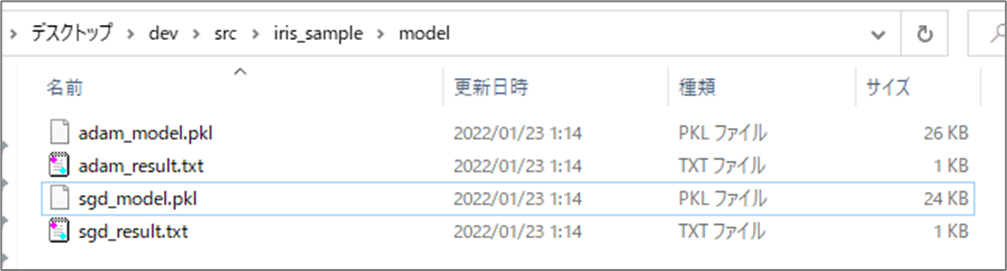
ここではモデルを二つ作成していますが、普通に一つで大丈夫です。
今回はadam_model.pklを使用します。
モデルの学習結果は一応result.txtにファイル出力しています。
予測ロジック実装
デスクトップアプリで入力数値から予測を行うためのロジック部を実装します。
但し、モデルはもう保存してあるので、ほぼモデルを呼び出し入力値と結果の受け渡しを行うだけです。
・サンプルコード(iris_estimated.py)
## iris_estimated.py
import numpy as np
import joblib
import sklearn
from sklearn.model_selection import train_test_split
from sklearn.neural_network import MLPClassifier
from sklearn.metrics import classification_report, accuracy_score

def estimate(parameters):
    # ニューラルネットワークのモデルを読み込み
    model = joblib.load('./model/adam_model.pkl')
    params = parameters.reshape(1,-1)
    pred = model.predict(params)
    return pred

def getName(label):
    print(label)
    if label == 0:
        return "setosa(ヒオウギアヤメ)"
    elif label == 1:
        return "versicolor(ブルーフラッグ)"
    elif label == 2:
        return "virginica(バージニカ)"
    else:
        return "Error"

## テスト用コード
#x = np.array([5, 4, 3, 4])
#pred = estimate(x)
#print(getName(pred))
作成したら一度テスト実行しておいた方がいいでしょう。
なんでもいいですが、例えば最下部に書いてあるコードをコメント解除して実行すると以下のような結果が得られます。
・テスト用コード部だけ抜粋
## テスト用コード
x = np.array([5, 4, 3, 4])
pred = estimate(x)
print(getName(pred))
上記のコードでは以下のような結果が得られます。
[2]
virginica(バージニカ)
デスクトップアプリのフロント実装
デスクトップアプリのUIとなるフロント部を実装します。
基本的にはお好みでどんな実装でもいいです。
今回はTkinterを使用します。
・サンプルコード(iris_front.py)
## iris_front.py
# Tkinterライブラリのインポート
import tkinter as tk
import tkinter.ttk as ttk
import re
from tkinter import font
import numpy as np
from iris_estimated import estimate as iris_est
from iris_estimated import getName

global txt1,txt2,txt3,txt4,root
labellist=["がくの長さ","がくの幅","花弁の長さ","花弁の幅"]

def re_enter(event):
    calculation()

## アヤメの分類
def estimate(x):
    pred = iris_est(x)
    return getName(pred)

# ボタン押下処理
def calculation():
    global txt1,txt2,txt3,txt4,resultLabel
    x = np.array([txt1.get(), txt2.get(), txt3.get(), txt4.get()])
    validateResult = validate(x)

    # 表示中のラベルを削除
    resultLabel.destroy()
    if validateResult is None:
        # 警告抑止
        x2 = np.array(x, dtype=float)
        result = estimate(x2)
        outputLabel="入力された情報から\n「"+ result + "」\nであると推測されます。"

        font1 = font.Font(family='Helvetica', size=10, weight='bold')
        resultLabel = tk.Label(root, text=outputLabel, fg="black", font=font1)
        resultLabel.place(x=10, y=240)
    else:
        font1 = font.Font(family='Helvetica', size=10, weight='bold')
        resultLabel = tk.Label(root, text=validateResult, fg="red", font=font1)
        resultLabel.place(x=10, y=240)

# リストの数値チェック
def validate(params):
    returntext = None
    for num in list(range(len(params))):
        result = numValidate(params[num])
        if result == False:
            if returntext is not None:
                returntext += "\n"
            else:
                returntext = ""
            returntext += str(labellist[num]) + "は数値で入力してください"

    return returntext

# 半角数字の入力チェック
def numValidate(num):
    try:
        float(num)
    except ValueError:
        return False
    else:
        return True

## テキストボックスの作成
def init():
    global txt1,txt2,txt3,txt4
    font1 = font.Font(family='Helvetica', size=10, weight='bold')

    # 1がくの長さの入力テキストボックスの作成
    label1 = tk.Label(root, text=labellist[0], fg="black", font=font1)
    label1.place(x=10, y=5)
    txt1 = tk.Entry(width=20)
    txt1.place(x=10, y=30)

    # 2がくの幅の入力テキストボックスの作成
    label2 = tk.Label(root, text=labellist[1], fg="black", font=font1)
    label2.place(x=10, y=55)
    txt2 = tk.Entry(width=20)
    txt2.place(x=10, y=80)

    # 3花弁の長さの入力テキストボックスの作成
    label3 = tk.Label(root, text=labellist[2], fg="black", font=font1)
    label3.place(x=10, y=105)
    txt3 = tk.Entry(width=20)
    txt3.place(x=10, y=130)

    # 4花弁の幅の入力テキストボックスの作成
    label4 = tk.Label(root, text=labellist[3], fg="black", font=font1)
    label4.place(x=10, y=155)
    txt4 = tk.Entry(width=20)
    txt4.place(x=10, y=180)

root = tk.Tk()
root.attributes("-topmost", True)
root.title("Iris estimate")
root.geometry("300x400")
resultLabel = tk.Label(root, text="")
resultLabel.pack()

# テキストボックスの作成
init()

# 解析ボタンの作成
btn = tk.Button(root, text="解析", command=calculation, height=1,width=8)
btn.place(x=10, y=210)

root.bind('<Return>', re_enter)
root.mainloop()
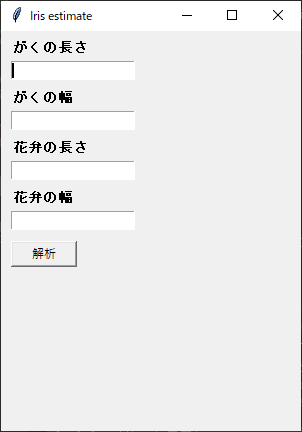
上記では以下のようなUIが表示されます。
デスクトップアプリ化する
pyinstallerを使用するので詳しくは以下も。
【参考】
【Python】PythonでGUI(デスクトップ)アプリを作ってみる@Windows - SEワンタンの独学備忘録
Anaconda Promptを起動して、ソースがあるフォルダに移動します。
(base) C:\Users\wanta>cd C:\Users\wanta\Desktop\dev\src\iris_sample
対象のソースを選択してpyinstallerを実行します。
(base) C:\Users\wanta\Desktop\dev\src\iris_sample>pyinstaller iris_front.py --onefile --noconsole
ちなみに今回は複数ファイルに分けて実装しましたが、呼び出し関係にあるファイルは基点となるファイルを指定すれば勝手に組み込んでくれるようです。
実行にはまぁまぁ時間がかかりました。
完了時には以下のようなメッセージが出力されました。
888537 INFO: Building EXE from EXE-00.toc completed successfully.
実行後はdistというフォルダができ、その中にアプリの本体の.exeファイルが入っています。
また、上記の実装の場合にはモデルであるadam_model.pklは外だしになっており、またファイルは相対パスになっているのでソースコードと同じ階層にあるmodelフォルダをdist内にまるごとコピーしました。
実行してみる
iris_front.exeを普通に実行します。
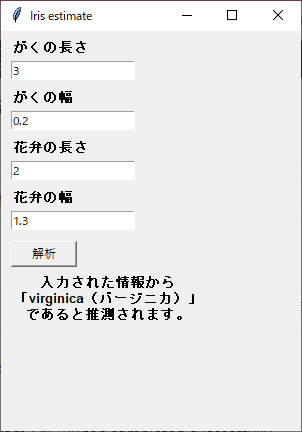
適当な値を入力して解析ボタンをクリック。

入力値を変えて再度解析。
数値以外の入力で解析。
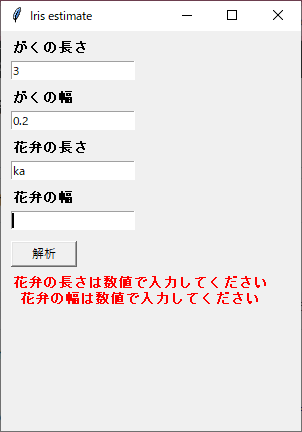
問題なさそうです。
発想とデータがあれば多少実践的に使えそうなものも作れる可能性もありますね。